CUPS とは Common Unix Printing System の略で UNIX 系 OS で動作する印刷システムです。
CUPS は印刷プロトコルとして IPP(Internet Printing Protocol)をサポートし、PPD(PostScript Printer Description)ファイルのサポートなどの機能を実装した強力な印刷システムです。
ここでは Linux サーバーに Canon の複合機 PIXUS MP500 を接続してプリントサーバーを構築します。
また CUPS の raw 印刷機能を有効してクライアントから直接 IPP ポートを使用して印刷を行うように設定を行います。
こうすることによって Linux 用のプリンタードライバは不要になります。(Windows クライアントのドライバは必要)
プリンターの接続
まずはサーバーの USB ポートにプリンターを接続してプリンターの電源を入れます。
プリンターが認識されて以下のようなメッセージが表示されます。
Vendor: Canon Model: MP500Storage Rev: 0109
Type: Direct-Access ANSI SCSI revision: 02
scsi 0:0:0:0: Attached scsi generic sg0 type 0
sd 0:0:0:0: Attached scsi removable disk sda
CUPS 設定
ブラウザを使って管理する場合は SSL 接続を求められるので証明書を作成します。

………..++++++
…….++++++
writing new private key to ‘/etc/cups/ssl/server.key’
—–
You are about to be asked to enter information that will be incorporated
into your certificate request.
What you are about to enter is what is called a Distinguished Name or a DN.
There are quite a few fields but you can leave some blank
For some fields there will be a default value,
If you enter ‘.’, the field will be left blank.
—–
Country Name (2 letter code) [GB]:JP
 国を入力
国を入力State or Province Name (full name) [Berkshire]:Osaka
 都道府県を入力
Locality Name (eg, city) [Newbury]:Osaka-shi
 市区町村を入力
Organization Name (eg, company) [My Company Ltd]:honana
 会社名を入力
Organizational Unit Name (eg, section) []:SSL
 部署を入力
部署を入力Common Name (eg, your name or your server’s hostname) []:server.honana.com
 サーバーのFQDN
Email Address []:.
 「.」で入力を省略
CUPS の設定は /etc/cups/cupsd.conf を使って行います。

# Only listen for connections from the local machine.
#Listen localhost:631コメントアウトする
#Listen /var/run/cups/cups.sockコメントアウトする
Port 631CUPSが待ち受けるポートを指定する
30 行目辺り
# Restrict access to the server…
<Location />
Order allow,deny
Allow localhost
Allow 192.168.0.0/24サーバーにアクセス可能なクライアントの IP アドレス
</Location>
# Restrict access to the admin pages…
<Location /admin>
Encryption Required
Order allow,deny
Allow localhost
Allow 192.168.0.0/24管理ページにアクセス可能なクライアントの IP アドレス
</Location>
以下省略
続いて raw 印刷機能を有効にする設定を行います。
/etc/cups/mime.types を以下のように変更します。

########################################################################
#
# Raw print file support…
#
# Comment the following type to prevent raw file printing.
#
application/octet-streamコメントアウトされていないことを確認する
#
# End of “$Id: mime.types 5402 2006-04-14 19:21:03Z mike $”.
#
/etc/cups/mime.convs を以下のように変更します。

########################################################################
#
# Raw filter…
#
# Uncomment the following filter to allow printing of arbitrary files
# without the -oraw option.
#
application/octet-stream application/vnd.cups-raw 0 –コメントアウトされている行を有効にする
#
# End of “$Id: mime.convs 5402 2006-04-14 19:21:03Z mike $”.
#
CUPS の再起動
CUPS の設定ファイルを変更した後は CUPS を再起動する必要があります。

CUPS を使ったプリンターの設定
Windows クライアントから https://192.168.0.2:631/ のようにアクセスして CUPS の画面が表示されることを確認します。
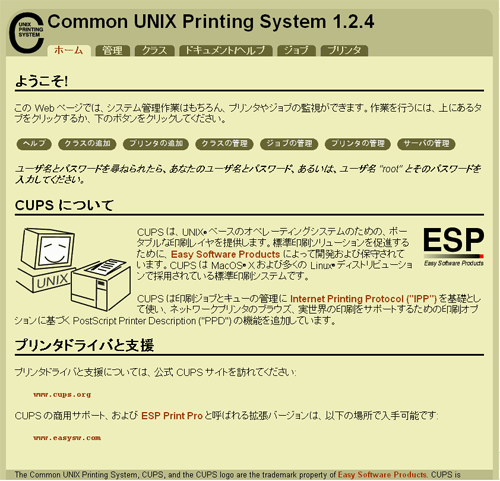
[ 管理 ] をクリックして CUPS の管理画面へ移動します。
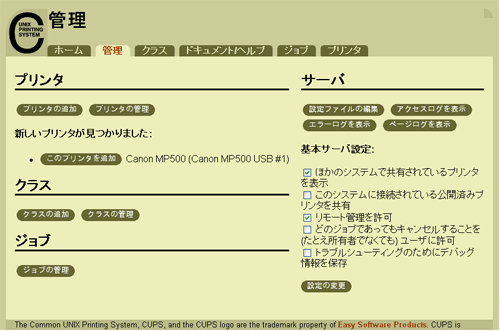
[ 新しいプリンタが見つかりました ] と表示され、サーバーに接続されているプリンターが表示されていることを確認して [ このプリンタを追加 ] をクリックします。
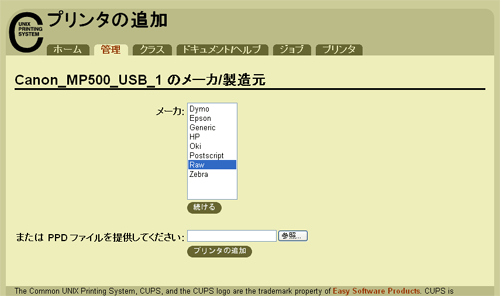
[ Canon_MP500_USB_1 のメーカ/製造元 ] の [ メーカ ] に [ Raw ] を選択して [ 続ける ] をクリックします。
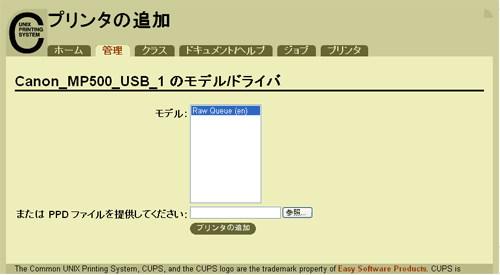
[ Canon_MP500_USB_1 のモデル/ドライバ ] の [ モデル ] に [ Raw Queue(en) ] を選択して [ プリンタの追加 ] をクリックします。
ユーザー名とパスワードの入力を求められた場合はサーバーマシンのユーザー名とそのパスワードを入力します。
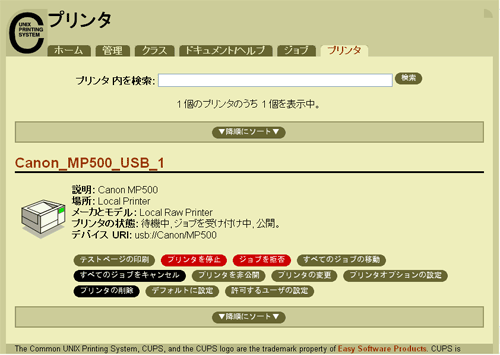
プリンターの設定画面で以下のように表示されていることを確認します。
Windows クライアントの設定
はじめにクライアントにプリンタードライバをインストールします。
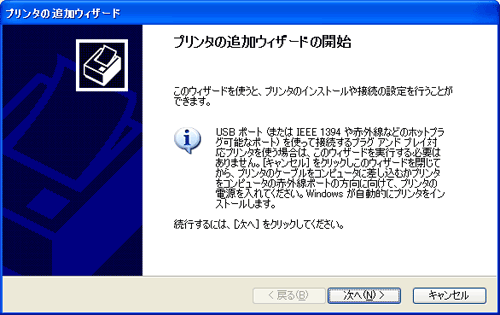
続いて Windows の [ スタート ] → [ 設定 ] → [ プリンタと FAX ] から [ プリンタの追加 ] をクリックします。
いかの画面が表示されると [ 次へ ] をクリックします。
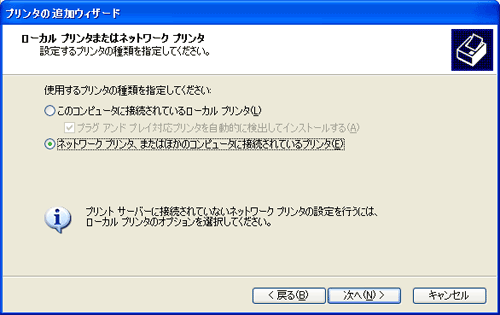
[ ネットワークプリンタ、またはほかのコンピュータに接続されているプリンタ(E) ] を選択して [ 次へ ] をクリックします。
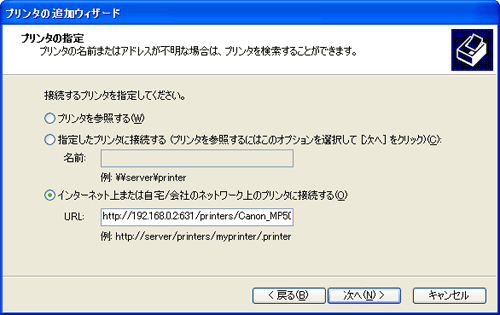
[ インターネット上または自宅/会社のネットワーク上のプリンタに接続する ] を選択して [ URL ] に [ http://192.168.0.2:631/printers/Canon_MP500_USB_1 ] のように入力して [ 次へ ] をクリックします。
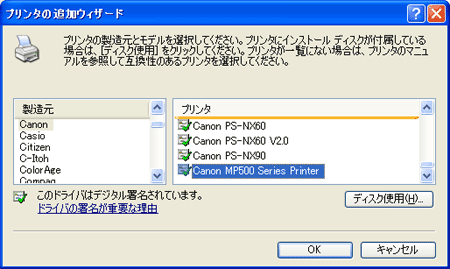
製造元に [ Canon ] を選択、プリンタに [ Canon MP500 Series Printer ] を選択して [ OK ] をクリックします。
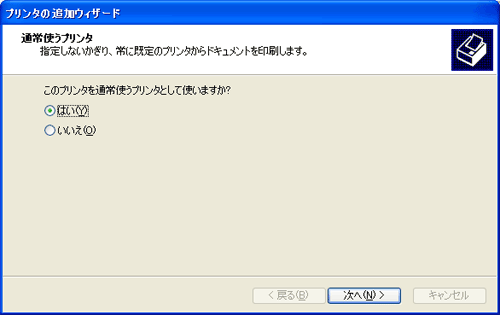
[ はい ] を選択して [ 次へ ] をクリックします。
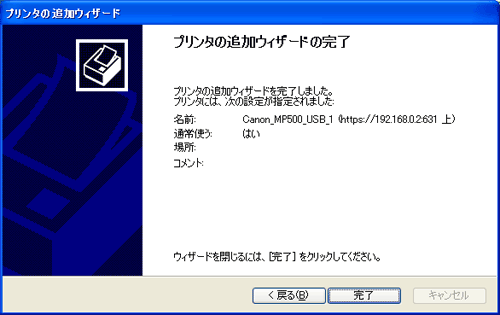
[ 完了 ] をクリックしてプリンタの追加作業を完了します。
